Showing posts with label baking. Show all posts

Saturday, April 21, 2012

Dark Chocolate Beet Cake

I am headed into 6 weeks of craziness.  There is not going to be any time for baking, blogging, reading, or cleaning (I wish).  I am using this weekend to get ahead on anything that I can.  I made meal plans for the next few weeks and the beets in my refrigerator didn't quite fit in (nobody is a fan but me).  I couldn't let them go to waste and because I won't be baking any time soon, I thought I'd make a cake I pinned a while back.  Chocolate Beet Cake by VeggieBelly

I'll let you go look at the recipe over at her place but here are a few of my pictures with some notes you might find helpful.  While cooking the beets the recipe said that the liquid should be gone after cooking but I had plenty of liquid left over. I drained it off and will add it to my morning smoothie.  It's the most beautiful red (sweet tasting, too). 

I love recipes where all the ingredients can be weighed.  It just easier that way and everything is ready to go. 

Isn't the beat puree awesome??  The recipe said that it took about 3-4 large beets to get 300 grams.  I had 3 beets and it was more than double what the recipe called for.  I saved the extra puree to add to Scarlett's apple sauce.  I think she'll dig the red if I don't add too much to change the taste.  If she won't go for it I can add that to my smoothies too.

The recipe called for a 10 inch cake pan but I used a 9 inch.  The baking time was a little longer and I probably could have left it in another minute or two.  I would much rather have a moist cake than a dry one and I find there is a fine line there.  I think my cooking time was 38 minutes.


I love a good ganache.  I didn't have heavy cream and not even enough half and half.  I ended up using half and half and 2% milk and only making about half the amount of ganache in the original recipe.  There was still tons left over which I will most likely eat by the spoonful right out of the jar.

If I waited to top it until the cake was completely cool I would have used more but I couldn't do it.  I had it on the cooling rack about 5 minutes before frosting it.   The recipe also says to let the ganache set before serving.  If letting the ganache set for 22 seconds counts (the time it took me to lick off the spatula), then I nailed that step.

The cake is incredibly moist and so very chocolaty, like a mud cake  I could taste a little beet because I obviously knew it was there.  My daughter just read this post over my shoulder and cannot believe I fed her beet cake.  She had no idea.  I haven't told anyone else and I made her promise she couldn't either.  It might kill her. She has this nervous laugh when she is holding something back and I'm thinking that the secret will be out as soon as anyone attempts to take a slice.  

**UPDATE**
This cake is so much better cooled the day after (I put it in the refrigerator because of the ganache). Absolutely no trace of beet.  Just one rich and chocolaty cake that is even good cold. 
This might be my go-to chocolate cake!
 

I love telling my peeps AFTER they eat something what they just ate.  I have been known to try some strange recipes and if they know beets are involved I know there will be no takers.   I really cannot afford to eat this entire cake by myself, although I can't help but think that it's a health food with all that beet (and all that sugar??)!  Maybe it will freeze well...I can ration it out over the next six weeks.


Go ahead and try this one!  You will be pleased!

And just to make you laugh....a picture of my youngest. 
This completely captures her true essence.


Wednesday, December 21, 2011

A Wedding is Coming! A Wedding is Coming!


Toppers!
I made these out of clay instead of fondant so they could keep them. 


Top tier of cupcake stand where the giant cupcake will sit!
The bride put this together because we had to rig the cupcake stand so it would work.  LOVE this.


And lots of flowers!

The wedding is on Friday.
I'll share the finished product then :)

Tuesday, December 20, 2011

Christmas Projects

I didn't do any Christmas baking this year for our family as I had a few orders for goodies from friends.  For teacher gifts we put together hot chocolate buffet boxes with hot cocoa,  chocolate covered mint spoons, candy cane stir sticks, marshmallows, and flavored creamers.  These turned out so cute.  I can't wait to have a hot cocoa bar set out on Christmas morning as well.  Never thought of that before but saw it on Pintrest which got my idea rolling.  Below are the individual hot cocoa jars we gave to specials teachers and support staff.  They came together quickly.


Emma's class is having a multicultural holiday party today and they were encouraged to bring in something from their background.  Mark's dad is Peruvian so we did a search and found that Alfajores de Dulce de Leche (Caramel Sandwich Cookies) were the most popular Peruvian cookie.  The recipe I used called for lots of rum and I obviously left that out.  This is the most corn starch I have ever used in one recipe and the cookies came out really flaky.  Nice. 

Monday, November 21, 2011

Kids in the Kitchen Loaded Pretzels

No shots of the kids actually IN the kitchen but I promise they did most of the work :) 
We made the flavor combos up as we went with our stocked pantry (aka my baking supply addiction)!

These are Chocolate Peanut Crunch. 
Melted chocolate covered in chopped peanuts and chopped peanut butter chips.


Classic M&M.  Melted chocolate covered in mini M&Ms.


The individual shots of the last ones all looked pretty funny.
Melted caramel, covered in chocolate drizzle and fall colored sprinkles.  These are awesome.  The salty pretzels combined with the sweet caramel is perfect.

Here they are all wrapped up.  They look so neat and tidy.  We made bundles of three, tied them with curly ribbon and a Happy Thanksgiving tag.  Easy (except the clean up, I'll find those sprinkles for days)!

Wednesday, November 2, 2011

Ruffles!


It's on the imperfect side of things but I have a good handle on how to make it better next time.  
HERE is the completed cake.

Monday, October 24, 2011

Fancy Nancy Snacks


I made tiny treats for the Fancy Nancy Family Reading Night at our daughter's school.  Not the best pictures, but here is my endless display of chocolate dipped marshmallows embellished with an M&M.  Easy, right?  I dipped around 300 in less than an hour and a half. The kids (and adults) loved them.  I also made the fancy ruffled crape paper streamers and tissue paper pom poms I have been wanting to do since seeing them on Pintrest.   Lots of fancy fun!

Saturday, May 28, 2011

German Chocolate Cupcakes

I have a TON of select cooking magazines that I save but never go back to once I've looked at them (Penzey's ONE, Taste of Home, and Cooking Club) so when a friend ordered German Chocolate Cupcakes instead of heading towards the Internet, I headed for my magazines. I remembered seeing this recipe in Penzey's. If you never heard of Penzey's ONE, it's worth checking out. Good recipes and stories. These turned out perfectly. I ate one for breakfast so am on a bit of a sugar rush right now. I had to test them before giving them to my friend, right??

German Chocolate Cupcakes
(adapted from Penzey's)


Preheat oven to 350.


4 oz bittersweet chocolate (I use Gheridelli - or find Baker's German Choc)
1/2 cup boiling water
1 cup butter
2 cups sugar
4 egg yolks
1 tsp vanilla
2 1/2 cups cake flour (or make your own with all purpose and corn starch)
1 tsp baking soda
1/2 tsp salt
1 cup buttermilk (or 1 cup milk and 2 T lemon juice - let sit 10 minutes)
4 egg whites, stiffly beaten

Melt the chocolate in boiling water and set aside to cool. Cream the butter and sugar until fluffy, then add egg yolks one at a time, scrape down bowl after each addition. Add vanilla and chocolate and mix well. Add dry ingredients alternately with buttermilk, then fold in the beaten egg whites. This made 24 cupcakes and a 5" mini cake. Bake for 15-20 minutes or until a toothpick comes out clean.

Coconut Pecan Frosting


1 Cup evaporated milk (see note below)
1 Cup sugar
3 egg yolks, slightly beaten
1/2 Cup butter
1 tsp. PURE VANILLA EXTRACT
2 Cups flaked coconut
1/2 Cup chopped pecans


Frosting: In a medium saucepan, combine the evaporated milk, sugar, egg yolks and butter. Cook, stirring constantly, over medium heat until thickened, about 10-12 minutes. Don't worry, it will thicken as it cools. Remove from heat; stir in VANILLA, coconut and pecans. Put in the refrigerator to cool.

***NOTE: I made 1 and a half times the recipe (used 5 yolks) because the can of evaporated milk contained 1 1/2 cups and I didn't have any other use for it.

Frost cake. Store leftover cake in the fridge.


This post has also been linked to:

Mouthwatering Monday at Southern Fairytale
Tempt My Tummy Tuesday at Blessed with Grace
Tuesday at the Table at All the Small Stuff
Recipe Swap at Prairie Story
Full Plate Thursday at Miz Helen's Country Cottage

Friday, March 25, 2011

Banana Cream Pie


I made this banana cream pie yesterday and could hardly wait for the overnight waiting for it to be done! I really enjoyed it but would probably use a little less corn starch next time. The custard was plenty thick. A good alternative to cake :)


Banana Cream Pie with Caramel Drizzles and Chocolate Sauce

(from Emeril's recipe on Food Network)


Ingredients 4 cups heavy cream

1 1/2 cups whole milk

1 1/2 cups plus 2 teaspoons granulated sugar

1 vanilla bean, split in half lengthwise and seeds scraped

3 large egg yolks

2 large eggs

1/2 cup cornstarch

1 recipe Graham Cracker Crust, recipe follows (I used a premade crust - gasp!)

3 pounds (about 9) firm but ripe bananas, peeled and cut crosswise into 1/2-inch-thick slices

1/2 teaspoon pure vanilla extract

Caramel Sauce, recipe follows (I didn't make this - so sweet already although it would have been yummy!)

Chocolate Sauce, recipe follows (I used some left over chocolate fondue)

Shaved chocolate, for garnish

Confectioner's sugar, for garnish

Instructions:

Combine 2 cups of the cream, the milk, 1/2 cup of the sugar, the vanilla bean, and the vanilla seeds in a large heavy-bottomed saucepan over medium heat. Bring to a gentle boil, whisking to dissolve the sugar. Remove from the heat.

Combine the egg yolks, eggs, cornstarch, and 1 cup of the sugar in a medium bowl, and whisk pale yellow in color. Set aside.

Whisk 1 cup of the hot cream mixture into the egg yolks. Gradually add the egg mixture to the hot cream, whisking constantly. Bring to a simmer, stirring constantly with a large wooden spoon to cook out the cornstarch and the mixture thickens, about 5 minutes. (The mixture may separate slightly. If so, remove from the heat and beat with an electric mixer until thick and smooth.) Strain through a fine mesh strainer into a clean bowl. Cover with plastic wrap, pressing down against the surface to prevent a skin from forming. Chill in the refrigerator for about 4 hours.

To assemble, spread 1/2 cup of the custard over the bottom of the prepared crust, smoothing with the back of a large spoon or rubber spatula. Arrange enough banana slices (not quite one-third) in a tight, tiled pattern over the custard, pressing down with your hands to pack them firmly. Repeat to build a second layer, using 3/4 cup of the custard and enough bananas to cover, smoothing down the layer evenly. For the third layer, spread 3/4 cup of custard over the bananas and top with the remaining bananas, starting 1-inch from the outer edge and working toward the center. Spread 1 cup of custard evenly over the bananas to prevent discoloration. Cover with plastic wrap and chill for at least 4 hours or overnight.


In a medium bowl, whip the cream until soft peaks form. Add the remaining 2 teaspoons of sugar and the vanilla extract and whip until stiff peaks form.

Remove the pie from the refrigerator. With a sharp knife dipped in hot water, cut the pie into 10 equal slices. Transfer the slices to dessert plates. Fill a pastry bag with the whipped cream and pipe onto each slice. (Alternately, spread the whipped cream evenly over the pie before cutting.)

Drizzle each slice with the caramel sauce and chocolate sauce, sprinkle with the chocolate shavings and confectioners' sugar, and serve.


Graham Cracker Crust: 1 1/4 cups graham cracker crumbs 1/4 cup sugar 4 tablespoons unsalted butter, melted

Preheat the oven to 350 degrees F. Combine the graham cracker crumbs and sugar in a medium bowl and mix well. Add the butter and mix well. Press the mixture into a 9-inch pie pan. Top with aluminum pie tin and with a circular motion, press the crust tightly into the pan. Bake until browned, about 25 minutes. Cool for 10 to 15 minutes. Yield: 1 (9-inch) crust

Caramel Sauce: 3/4 cup sugar 2 tablespoons water 1/2 teaspoon fresh lemon juice 1/2 cup heavy cream 2 tablespoons to 1/4 cup whole milk

Combine the sugar, water, and lemon juice in a medium, heavy saucepan over medium-high heat. Cook, stirring, until the sugar dissolves. Let boil without stirring until the mixture becomes a deep amber color, 2 to 3 minutes, watching closely so it doesn't burn. Add the cream, whisk to combine, and remove from the heat. Add the milk, 2 tablespoons at a time, until the desired consistency is reached. Remove from the heat and cool to room temperature before serving with the pie. (The sauce will thicken as it cools.) Yield: generous 3/4 cup

Chocolate Sauce: 3/4 cup half-and-half 1 tablespoon unsalted butter 1/2 pound semisweet chocolate chips 1/4 teaspoon pure vanilla extract

Scald the half-and-half and butter in a small, heavy saucepan over medium heat. Remove from the heat. Place the chocolate and vanilla in a medium, heat-proof bowl. Add the hot half-and-half and let sit for 2 minutes, then whisk until smooth. Serve slightly warm. (The sauce can be kept refrigerated in an airtight container for several days, but it must be returned to room temperature before serving. Yield: generous 3/4 cup


This post has also been linked to:

Mouthwatering Monday at Southern Fairytale

Tempt My Tummy Tuesday at Blessed with Grace

Tuesday at the Table at All the Small Stuff

Hearth and Soul at A Moderate Life

Recipe Swap at Prairie Story

Full Plate Thursday at Miz Helen's Country Cottage

Wednesday, March 16, 2011

Crafting and Baking Once Again

Yea!  My classes are finally done!  I now have time for baking and crafting.  I have been seeing several chocolate chip cookie recipes lately, and although I found the perfect CCC last fall,
I am willing to test that theory :) 

The ones I made today came from a recipe over at Brown Eyed Baker (drool);  Thick and Chewy Chocolate Chip Cookies.    They were big and soft (a MUST with CCC for me) but not at all cakey, and perfect.  Both recipes use melted butter.  I need to go back and see if they are the same!  
Can't go wrong here. 


After the baking I worked on a quick craft that I had book marked for a while, No Slip Bookmarks at Mary Janes and Galoshes.  I have a TON of ribbon in my craft closet that is perfect for this project.  Each bookmark took less than 10 minutes.  Seriously cute!  I can't wait to find more big buttons to go with my ribbon supply. Everyone is getting a bookmark for their birthday this year :)


And, I just looked at the CCC recipe from last fall and they are EXACTLY the same.  Funny.  No wonder they both turned out perfectly.

Monday, February 14, 2011

Kit Kat and Candy Cakes

Have you seen Kit Kat cakes?  HERE is a better look at my Valentine's take of them.


Monday, February 7, 2011

Cheerios Peach Crisp

The folks at Cheerios asked me to come up with a breakfast or springtime experience my family will love using Original Cheerios and seasonal ingredients. I made a Carmel Apple Cheerios Picnic Mix and then couldn't accept that I made it using fall ingredients (even though it is great for spring picnics).  The next thing I came upon were peaches.  Our family drives through Georgia each year, stops at a roadside stand and loads up on peaches.  I freeze them just for peach crisp and they are still so pretty when spring roles around.  So on my second attempt I came up with a peach crisp using a ground Cheerio topping.  YUM!!  We all love this.  The Cheerios give the streusel topping so much more depth of flavor than a regular white flour base.  This will be my go-to peach crisp.  So, can we all get on board with peaches as a spring ingredient?  LOL, probably not.  I missed the mark again with the seasonal ingredients but I sure didn't miss the mark with the recipe!  I even ate it the next morning for breakfast, you know, just to be in line with the given theme :)  Try it!

Peach Crisp with Cheerio Streusel

Filling:
9 ripe peaches, peel and pit, sliced
1/2 cup sugar
1 teaspoon cinnamon
1 teaspoon vanilla
2 Tablespoons wheat flour (or ground Cheerios)

Topping:
1 stick cold butter
3 1/3 cups Cheerios, divided
1/3 cup sugar
1/3 cup brown sugar
1 teaspoon cinnamon

Combine peaches, sugar, cinnamon, vanilla, and flour in a 9x13 pan.


Put 3 cups of Cheerios in a blender and blend until it's the consistency of flour.


Combine ground Cheerios, butter, sugars and cinnamon in a large bowl.


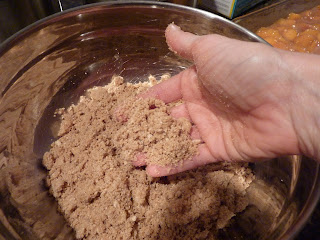
Using your hands (or a pastry cutter) rub through your fingers until the topping is a coarse texture.  Add remaining 1/2 cup of Cheerios and blend well (smoosh the butter mixture all around the whole Cheerios)


Place topping on top of peaches.


Bake at 350 degrees for 30 minutes.  The topping will be golden brown and peaches will be bubbly.


Eat it warm topped with vanilla ice cream. 
Skip the ice cream when eating it for breakfast the next morning (or not :).


Have you visited the Cheerios Facebook page yet?

Monday, January 3, 2011

Cracked (or bulgur) Wheat Bread


I cleaned out my pantry and made an inventory of odd things that needed to get used up. One of those things was bulgur wheat. Not sure what my intent was when I bought it. Last week I went to the library and go a big stack of cookbooks for us girls to look through. My favorite cookbook (meaning I went through it and wanted to bookmark every recipe) was A Passion for Baking by Marcy Goldman. On the cover it says, "Bake to celebrate ~ Bake to nourish ~ Bake for fun", which I love. If you love cookbooks like I do, this would be one to browse through next time you are at the library or book store! The Best Pizza Dough Ever...Deluxe Sticky Ooey-Gooey Peanut Butter Cookies....White Chocolate and Vanilla Bread Pudding....Choclate Chip Cookie Dough Cheesecake. I'll stop.


Cracked Wheat Bread
from A Passion For Baking by Marcy Goldman


1/2 cup cracked wheat or bulgur wheat
3/4 cup boiling water
1 1/4 cups warm water (100 to 110 degrees)
2 1/2 teaspoons rapid rise yeast (I used regular and was fine, maybe a little less lofty)
1 1/2 cup wheat flour
2 tablespoons honey
1 1/4 teaspoon salt
1 to 2 cups bread flour
cracked wheat, cornmeal, and bran for dusting

In a medium bowl, cover cracked wheat with boiling water and let stand for 20 minutes.

In a mixer bowl, hand whisk warm water and yeast together and let stand 2 or 3 minutes to dissolve. Add whole wheat flour, honey, salt, and soaked wheat and mix well. Add most of bread flour and then knead with a bread hook on the lowest speed, adding more bread flour as needed to make a soft dough. Knead on low for 6 to 8 minutes.

Remove dough hook, spray dough with cooking spray, cover and put in a warm place. Let rise 45 to 60 minutes, until doubled.

Preheat oven to 375 degrees.

Shape into a ball and sprinkle with wheat, cornmeal and bran. Place on a parchment lined cookie sheet and cover with plastic wrap and let rise 30 to 45 minutes.

Bake 35 to 40 minutes, until done.

Enjoy!

This post has also been linked to:
Mouthwatering Monday at Southern Fairytale
Tempt My Tummy Tuesday at Blessed with Grace
Tuesday at the Table at All the Small Stuff
What's on The Menu Wednesday at Dining With Debbie
Hearth and Soul at A Moderate Life
Recipe Swap at Prairie Story (Thursdays)
Recipe Swap at The Grocery Cart Challenge

Monday, December 20, 2010

Last Minute Gift?? Giant Cookie!


Don't you love cookie cakes? I'm not sure why cookie cakes taste so much better than regular cookies but I think they do. I love chewy cookies and I think there's more chewy in a slice of cookie cake. If you like crunchy cookies you may not agree with me.

I made one Peanut Butter Chocolate Chip (top) and one regular Chocolate Chip (bottom). While both tasted great (I liked the PB one better because I LOVE peanut butter. Yes, I could marry it.), the peanut butter one looked a lot better. They are really easy to make and I'm giving out a few for Christmas gifts this year

(what PE coach wouldn't want a big cookie?).

I used disposable 13" pizza pans.

Peanut Butter Chocolate Chip
Cookie Cake Recipe
(from Almost Bourdain)

6 TBS butter, softened
1/4 cup smooth peanut butter
1 1/4 cup milk chocolate chips
1 cup flour
1 1/2 teaspoons baking powder
1/4 teaspoon salt
1 cup light brown sugar
1 teaspoon vanilla extract
1 large egg

Preheat the oven to 180C.
Whisk the flour, baking powder and salt together in a medium bowl and set aside.

Using a stand mixer or a hand mixer, cream the butter, peanut butter, light brown sugar, and vanilla extracts on medium speed until well combined, about 1 minute.

Increase the mixer speed to high and beat for 15 seconds. Stop the mixer, scrape down the sides of the bowl, and add the egg.

Blend on medium speed for 30 seconds.

Add the dry ingredients and combine on low speed until just a few dry streaks remain.
Add the chocolate chips and mix for a few seconds until combined.

Scrape the batter into a greased and lined 10-inch round cake tin (or a 13" disposable pizza tin if giving away - it looks like there isn't enough batter but there is - turns out perfectly).

Press the batter into a smooth and even layer in the pan. Bake until lightly golden and puffy around the edges (the center should still feel quite soft), 18 – 22 minutes (I baked mine for 15 minutes, as it was larger and flatter).

Cool for 10 minutes and then run a paring knife around the edge of the pan to release the cake. Or leave it in the disposable pan if you are giving for a gift!
The Chocolate Chip Cookie Cake recipe came from Food Network.

This post has also been linked to:

Mouthwatering Monday at Southern Fairytale

Tempt My Tummy Tuesday at Blessed with Grace

Tuesday at the Table at All the Small Stuff

What's on The Menu Wednesday at Dining With Debbie

Hearth and Soul at A Moderate Life

Recipe Swap at Prairie Story (Thursdays)

Colleen's Fall Recipe Swap at Colleen's Kitchen (Fridays)

Sunday, December 19, 2010

Tempt My Tummy - Pecan Pie Bars

Oh man, these are tasty! I had to give them all away or I would have eaten every last one one them. I'm not big on pecan pie but because of the shortbread crust these were entirely different, even a pecan pie loving friend thought they were awesome - so they should please everyone. They keep well so feel free to make them several days ahead of time.


Pecan Pie Bars
Makes 24 bars

For the Shortbread Crust:
1 1/2 sticks cold, unsalted butter
2 cups all-purpose flour
1/2 cup packed, light brown sugar
1/2 teaspoon salt

For the Pie Filling:
2 heaping cups of whole pecans
1 stick (1/2 cup) unsalted butter
1 cup packed, light brown sugar
1/3 cup honey
2 tablespoons heavy cream
1/2 teaspoon salt
1 teaspoon pure vanilla extract

Preheat the oven to 350 degrees Fahrenheit.

Line a 13 x 9 x 2-inch pan with parchment paper or foil leaving some excess hanging over the ends.

To make the crust, cut the butter into a 1/2-inch dice. Then, in a food processor fitted with a metal blade, process all the ingredients for the crust together until the mixture begins to form tiny lumps and appears downey, about 30-45 seconds. Put this mixture into the prepared pan and using your hands or a big spatula, evenly press the shortbread crust into the bottom of the pan. Bake in the middle of the oven until golden, about 18-20 minutes.

While the shortbread crust is baking, prepare the filling.

To make the filling, roughly chop the pecans. It's ok to have some whole pecans and some pecan pieces. Set aside. In a heavy saucepan over medium heat, melt the butter, brown sugar, honey, cream and salt. Bring to a simmer and allow to bubble, stirring occasionally, for about 1 minute. Remove from heat and stir in vanilla extract and pecans. Pour the pecan filling into the hot shortbread crust and spread as evenly as possible. Bake in the middle of the oven until bubbling evenly all over, about 12-15 minutes.

Cool completely, lift out of the baking pan using the overhanging parchment or foil and cut into bars. At this point, you can just start eating the bars, they are very tasty plain. You can also dip them in chocolate if that is your thing.

These bars will keep, covered, for at least 5 days at room temperature (if they last that long!).

This post has also been linked to:
Mouthwatering Monday at Southern Fairytale
Tempt My Tummy Tuesday at Blessed with Grace
Tuesday at the Table at All the Small Stuff
What's on The Menu Wednesday at Dining With Debbie
Hearth and Soul at A Moderate Life
Recipe Swap at Prairie Story (Thursdays)
Colleen's Fall Recipe Swap at Colleen's Kitchen (Fridays)

Sunday, December 12, 2010

Mint Chocolate Chip Cookies

My daughters love mint chocolate chip ice cream so when I came across this recipe on the Betty Crocker site, I knew I had to try it. They were quick (used a mix) and very good. I'll be making these again and again for my mint loving girls.


Mint Chocolate Chip Cookies

1 pouch (1 lb 1.5 oz) Betty Crocker sugar cookie mix (I used the Krusteaze mix that is a little less volume but were only .19 at Publix last week with coupons!!)

1/2 cup butter, softened

1/2 tsp mint extract

7 drops green food coloring (I would make them without color from now on but when giving them as gifts, it's nice for the colored hint that they are mint)

1 egg

1 cup creme de menthe baking chips (Andes!)

1 cup semi sweet chocolate chips (I did not use these - they really are chippy enough without them)


Heat oven to 350. I large bowl, stir cookie mix, butter, extract, food coloring, and egg until soft dough forms. This is thick dough so feel free to use your hands to get it all mixed up. Mix in chips.


Using a small cookie scoop or teaspoon, drop dough 2 inches apart on ungreased cookie sheet.


Bake 7-10 minutes - take out when they are just getting a little brown. Don't over bake them for soft cookies! Remove from over to wire rack. Store in tightly covered container.


YUM!! YUM!! YUM!! A very festive cookie.

This post has also been linked to:

Mouthwatering Monday at Southern Fairytale

Tempt My Tummy Tuesday at Blessed with Grace

Tuesday at the Table at All the Small Stuff

MERRY, MERRY MUNCHIES 2010 at Dining With Debbie

Recipe Swap at Prairie Story (Thursdays)

Christmas Recipe Party at Simply Sweet Home (Thursday)

Colleen's Fall Recipe Swap at Colleen's Kitchen (Fridays)

Enter my HUGE Crayola giveaway HERE!

Monday, December 6, 2010

Thin Crust St. Louis Style Pizza

This summer while we were at my Aunt's cabin in Northern Minnesota I copied down this recipe from one of her magazines. I find that if I write the recipe out by hand I am more likely to try it. I have SO MANY recipes on file to try. Anyway....this has been my family's favorite pizza crust yet (although I cannot tell if my husband likes it, he won't really say, but he eats it) and it's really easy to make. I cannot say if it's authentic St. Louis style, but it sure is yummy!


St. Louis Style Pizza Crust
2 cups flour
2 TBS corn starch
2 tsp sugar
1 tsp baking powder
1 tsp salt
1/2 cup plus 2 TBS water
2 TBS olive oil
Mix together dry ingredients then add water and oil. Mix/knead until it comes together. You may have to add a tiny bit of additional water. Break the dough into 2 portions then roll THIN. The original recipe says to roll the dough between 2 pieces of parchment paper, which I did the first time I made it and works beautifully. But I just got the most wonderful pastry mat and it rolled out just fine without anything (no additional flour, no parchment). It will all depend on your surface.
Preheat pan or stone (or like we do, both) at 475 degrees. When the oven is preheated I put the crust on the pan/stone and bake for 3 or 4 minutes before topping because we like it crispy. Then I take it out, top it however, and put it back in to bake until the cheese is a little brown, 8 minutes or so.


See THIS is my new pastry mat and it is perfect! It sticks to the counter - absolutely no sliding around. Whatever I am rolling out does not stick to it. The only down side is that it has a slight criss cross pattern to it, so when I am rolling out fondant I need to use the up side to get a completely smooth surface. I love this mat.

And THIS is where I was coming from. Pretty worthless. There is just no comparison.

This post has also been linked to:
Mouthwatering Monday at Southern Fairytale
Tempt My Tummy Tuesday at Blessed with Grace
Tuesday at the Table at All the Small Stuff
What's on The Menu Wednesday at Dining With Debbie
Hearth and Soul at A Moderate Life
Recipe Swap at Prairie Story (Thursdays)
Colleen's Fall Recipe Swap at Colleen's Kitchen (Fridays)

Sunday, November 28, 2010

Rocky Road Fluff Bars


So I posted a few weeks about my YUMMY Peanut Butter Fluff bars.....which I LOVE LOVE LOVE. I decided to change it up this time and make Rocky Road Fluff bars. Just as good. Chewy. Nutty. Marshmallowy. And now I am contemplating even more adjustments - butterscotch chips, mint chips....hmmmm. For now, here are the Rocky Road version. Enjoy!

Rocky Road Fluff Bars


3 T butter
12 ounces chocolate chips (I used all my half empty bags of semi and milk chocolate chips)
1 can sweetened condensed milk
15 oz (or so) mini marshmallows
2 cups dry roasted almost, chopped


Melt butter and chips over low heat. Add sweetened condensed milk and about 10 oz marshmallows (doesn’t have to be exact). Heat until marshmallows are melted.Scatter 1 cup almonds and half of the reserved marshmallows on the bottom of a greased 9x13 pan. Pour chocolate mixture on top and top with the rest of the almonds and marshmallows. Refrigerate before cutting. Best when cold.


Did you know that Advent started Sunday? Check out my ideas for celebrating with your family HERE and make it a month-long family celebration!


This post has also been linked to:
Mouthwatering Monday at Southern Fairytale
Tempt My Tummy Tuesday at Blessed with Grace
Tuesday at the Table at All the Small Stuff
What's on The Menu Wednesday at Dining With Debbie
Recipe Swap at Prairie Story (Thursdays)
Colleen's Fall Recipe Swap at Colleen's Kitchen (Fridays)

Sunday, November 21, 2010

Pumpkin Crumb Coffee Cake

I got this recipe from AllYou magazine and it's a keeper! Moist, nice crumb topping, PUMPKIN! My girls helped me make and eat this yummy treat. This is even better the next day. Did I mention it's very moist and the crumb topping is WONDERFUL?


Pumpkin Crumb Coffee Cake


Topping:
1 cup all-purpose flour
1/2 cup packed dark brown sugar
Pinch of salt
1 1/2 teaspoons cinnamon
6 tablespoons unsalted butter, cold, cut into pieces


Cake:
2 cups all-purpose flour
1 1/2 teaspoons baking powder
1/2 teaspoon baking soda
1/2 teaspoon salt
1 tablespoon cinnamon
2 teaspoons ground ginger
1/2 teaspoon nutmeg
1/3 cup vegetable oil
3/4 cup unsweetened applesauce
1 15-oz. can pumpkin
1 teaspoon vanilla extract
1 1/2 cups sugar
1/2 cup packed dark brown sugar
2 large eggs, at room temperature, lightly beaten


Preparation
1. Make topping: In a bowl, stir together flour, brown sugar, salt and cinnamon. Add butter and combine with fingertips until mixture is crumbly. Refrigerate while making batter.


2. Make cake: Preheat oven to 350ºF. Butter and flour a 9-by-13-inch cake pan. In a small bowl, combine flour, baking powder, baking soda, salt and spices. In a large bowl, whisk together oil, applesauce, pumpkin, vanilla and both sugars until well mixed. Whisk in eggs. Add flour mixture to pumpkin mixture and stir until just combined; do not over mix. Pour batter into cake pan and spread evenly. Sprinkle with reserved topping.


3. Bake cake until a toothpick inserted into center comes out clean, 45 to 50 minutes. Allow to cool in pan on a wire rack at least 20 minutes.


This post has also been linked to:

Mouthwatering Monday at Southern Fairytale

Tempt My Tummy Tuesday at Blessed with Grace

Tuesday at the Table at All the Small Stuff

What's on The Menu Wednesday at Dining With Debbie

Recipe Swap at Prairie Story (Thursdays)

Colleen's Fall Recipe Swap at Colleen's Kitchen (Fridays)

Saturday, November 13, 2010

Peanut Butter Fluff Bars

I love all things peanut butter and these bars are very peanut buttery (and you can't go wrong adding marshmallow to anything either)!

Peanut Butter Fluff Bars

3 T butter
bag of PB chips
1 can sweetened condensed milk
15 oz (or so) mini marshmallows
2 cups dry roasted peanuts

Melt butter and PB chips over low heat. Add sweetened condensed milk and about 10 oz marshmallows (doesn’t have to be exact). Heat until marshmallows are melted.

Scatter 1 cup peanuts and half of the reserved marshmallows on the bottom of a greased 9x13 pan. Pour PB mixture on top and top with the rest of the peanuts and marshmallows. Refrigerate before cutting. Best when cold.


This post has also been linked to:
Mouthwatering Monday at Southern Fairytale
Tempt My Tummy Tuesday at Blessed with Grace
Tuesday at the Table at All the Small Stuff
What's on The Menu Wednesday at Dining With Debbie
Recipe Swap at Prairie Story (Thursdays)
Colleen's Fall Recipe Swap at Colleen's Kitchen (Fridays)