Showing posts with label crafts. Show all posts

Friday, February 15, 2013

DIY Etched Mason Jars - Sleepover Party Favors - Tutorial


I have been slacking on the party planning for an upcoming sleepover.  In previous years we had tons of girls, which requires tons of planning.  This year there are only 3 special friends sleeping over.  My oldest has finally discovered that less is more!  Can I get a Hallelujah?

Despite my last minute efforts, I think these turned out beautifully.  I actually had everything on had.  I had the glass etching cream from when I did the wedding gift casserole dishes.    The cute flower cut out lids came from a recent Pick Your Plum impulse buy.  You can get them on Etsy as well.  The white lids I have on the jars in the tutorial are from Mountain Woman Products.  They are leak proof and I LOVE them!


Step 1.  Tape off the portion of jar where you want to etch.  Use letter stickers for the name.  Make sure all are completely fastened or the etching cream will leak in.


Step 2.  Thickly apply the etching cream.  And wait 20 minutes.  The directions on the cream say to wait 5 minutes but I think it makes a bolder etching if it stays on longer. 


Step 3.  Rinse cream off jar with water, take off letters, wash thoroughly before using.


Couldn't be easier!


Saturday, November 10, 2012

Chunky Block Nativity Set

Here is an inexpensive gift for a child in your life.  Takes a little bit of elbow grease but is well worth the effort.  I can see these in my classroom and in my home for many years to come.


Nativity set made from a 4x6 scrap and old paint we had in the garage.   I cut, sanded, painted, sanded again (for the aged look), and then Mod Podged the graphic to the front of each block.


Mary, Joseph, Jesus (sprayed this block with gold before sanding the second time), the angel and star.


Caesar Augustus, Innkeeper, Wise Men and camel.


Shepherd man and boy, sheep, donkey and cow. 

I love how it's a very complete set.

I got the graphics from Prepared Not Scared.   They worked well and her script of the nativity play will go great while telling the story initially to my kids.  I'll laminate it as well so the kids can use it when they are playing with the set. 

I Can Teach My Child

Saturday, July 7, 2012

Making Things for the Preschool Classroom

The minute school gets out I have a list of a dozen things I want to make for my classroom for next year.  Here are a few I have finished.


I love the Montessori Color Tablets because they have so many uses.  I've made my set with paint chips, trimmed and glued back to back so the same color is on both sides.  They will get laminated before use.  My students will start out practicing their visual discrimination, trying to put them in order, and learning what light and dark colors are.  They will be useful when teaching primary and secondary colors.


I got the idea for these craft stick barnyard animals from Make and Takes.  I'll use them in my barnyard sensory box.  Sensory boxes are another new thing I am doing this year.  I had a few very basic ones last year and the kids adored them.  I've been collecting things like mad to have one or two each month. 

Lots more to come.... 

On a side note, the spell check in Blogger isn't working.  Anyone else use Blogger and have this problem and know how to fix it?

Friday, March 9, 2012

Spring Bulletin Board for Preschool


I got the idea for this bulletin board from Mrs. Picasso's Art Room.  I figured it would be good for the rest of the year, for spring and graduation.  Fly...


It's not a great picture but I strung together a bunch of die cuts for my window.  Clouds, butterflies (sewn together), pinwheels, flowers, and grass (also sewn together).  I love it.

Here is a great activity to get kids to use their pinchers, a torn paper rainbow.  Tearing is a skill that many of my kids didn't come into the class with.  Opening their lunches themselves also help with these fine motor muscles.   The Bible verse is from Genesis 9:13, I have set My rainbow in the clouds.


Wednesday, November 23, 2011

A Solution to Threading Yarn With Little Hands

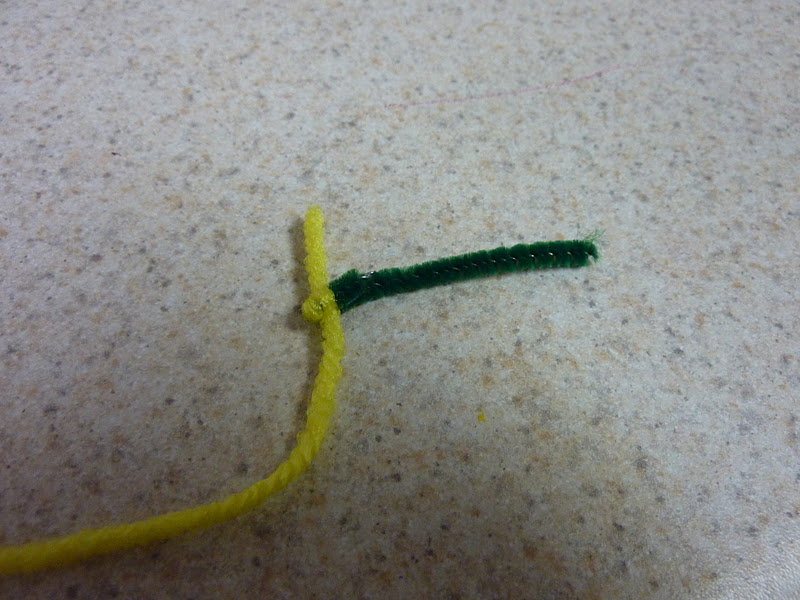
For all threading projects I have always used tape on the end of the yarn to make it easier for little hands to sew, lace or thread beads.  It is one of those things that was an OK solution but an aggravating one at that.  A little piece of pipe cleaner changed all that and I am VERY happy with the results.  The needle stays on, the yarn does not fray, and it's much easier for the little hands to work. 


All I did was wrap the yarn around the bottom of the pipe cleaner, fold it over, and twist a little. 
Works wonders and it's reusable!


The piece of tape at the other end of the yarn is also strategically placed so the yard doesn't pull through (or the beads don't fall off) AND is a great place for their name.  Sometimes I tape it to the table so it's not tempting to swing it around. 


I've used it with threading pasta for a necklace and it works well in that project as well.

Works for ME!!  Go to We are THAT Family for more Works for Me Wednesday ideas!

Tuesday, November 22, 2011

Funky Christmas Door Hanging Instead of a Traditional Wreath

Started with a picture frame from Salvation Army, took out glass and backing, and spray painted it white.


Hung funky colored ornaments (found at Michael's) with wire at different lengths.


Attached a few glittery floral sprays with wire to figure out placement but will go back with hot glue once I've got it where I like it.


Added a bow and called it a day.  I'll get a better picture of it once it is hung AFTER Thanksgiving.  Doesn't all this Christmas decore BEFORE Thanksgiving drive you a little crazy??  :)

Wednesday, November 16, 2011

The Turkey is a Big Hit!


I made a paper bag turkey for the dramatic play area of my classroom and it's been a big hit!  They have been basting, cutting, and serving it all day.  The tutorial can be found over at One Charming Party.  I stuffed mine with newspaper instead of popcorn to give it a little longevity.  It seriously took less than 5 minutes to make.  Got a paper bag and a glue gun?  Go make it!  Your kids will love it!

Tuesday, October 11, 2011

Paper Pumpkins


I got the idea for these from Creations by Kara where she has a tutorial on them.  I didn't have orange spray paint so I used a paint brush and acrylic paint which worked well.  Cute fall decor or hostess gift!

Saturday, October 8, 2011

Sewing a Tube Necklace

I intended to make this necklace I found on Pinterest....

Pinned Image


 but didn't have enough fabric.  Don't you love the gray and yellow??  Here is my SIMPLE tube necklace......


Sew a tube (long rectangle, fold wrong sides together and sew down the long side), twist a little bit, and sew the ends together.  SIMPLE.

Friday, October 7, 2011

YoYo Painting and Fall Bulletin Board


When I first started my blog I featured Yo-Yo painting.  Cut off a leg of a nylon, fill the bottom with dried beans, tie it off, stick it in paint and bounce it off the paper in a yo-yo motion.  The girls loved it and just recently asked to do it again.  In the picture above they are making a friend a very large birthday card.

On a side note, the Yo-Yo painter is much easier to clean than I expected.  Just rinse and you are ready for the next time.


I then took this method of painting to class and they LOVED it and asked to do it again the very next day.  I took a piece of bulletin board paper big enough that everyone in class could stand around the perimeter.  One person yo-yo painted for a little while and passed it to the next person.  Each different round we used a different color and each person filled in the space right in front of them.  I then incorporated the paper into my fall bulletin board as the fall leaves.


See the dotty texture?  It worked perfectly and the kids are still asking to do this kind of painting again.    What are your fall bulletin board ideas?

Tuesday, August 9, 2011

Can't Get Enough Pinterest Color!


If you are on Pinterest I am sure you have seen this type of melted crayon art.  The colors, the medium, the simplicity......I couldn't resist making one for my classroom!   Canvas, crayons, glue gun, blow dryer, done.

I still haven't figured out how to pin items that are not already on someone's Pinterest board (I mainly use aol and cannot load a tool bar to aol) but I have not run out of boards to look at.  In fact, I have to force myself away from the computer because it sucks me in so easily.   Usually I am into food or cake boards but this last week has been all about preschool ideas.  So much good stuff!


Do you use Pinterest?  What sucks you in?

Thursday, August 4, 2011

Make Your Own Pencil Case!


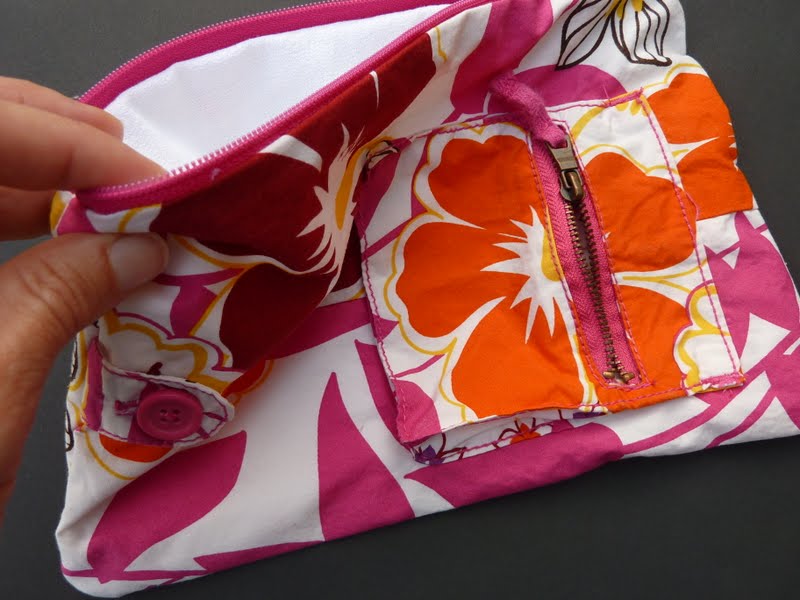
I finally bought the zippers I needed to make the rest of the pencils cases I had cut out and I just love them!  I used this awesome TUTORIAL at Creation Corner.  Her directions are perfect!  The first one I made out of an older sweater, which I posted a few weeks ago, so I had to improvise.  These three were made using the tutorial exactly and took less than 30 minutes a piece to put together! 


The one above is embellished with the ruffle, like the tutorial.  I used a 9 inch zipper and cut the material accordingly.  They had to be long enough for pencils but I made them deep enough for LOTS of pencils, or whatever else a girl may need to store in there. 

The flowery ones are made out of these.....(which required too much ironing for the likes of this house).


I cut them to incorporate the little zippered pockets that were already on the pants.  Bonus - an eraser pocket!  I also left the button and loop on just for a little extra flair :)


Project complete.  Now I can clear off the sewing table!

Linking to:


Party ButtonFantabulous Friday!>> http://linesacrossmyface.blogspot.com/search/label/the%20Cure%20for%20the%20Common%20Monday

Saturday, July 16, 2011

Repurposed Sweater Pencil Bag


The Repurposed Sweater Pencil Bag


I saved this baby sweater because I loved the colors and figured I would find something to make with it. Bigs needed a pencil bag for next fall and she chose this from the fabric scraps presented to her. It's a little longer than a normal pencil bag because I didn't want to have to restitch the side seam. I cut the bottom off the sweater, stitched the cut side together, did the little wrap around stitch so the sweater won't come undone, then sewed the zipper in.  It turned out cute and I still have plenty of sweater left :)


Wednesday, June 8, 2011

Graduation Cards

This year I made a huge batch of these cards for birthdays. Each year I do something different but try to make enough to last all year. It's nice to always have a card on hand for those weeks that I just cannot get to making anything. With graduation parties coming up, instead of making something new all the owls needed were graduation caps (and a Congratulations stamp - I leave them blank until I need them). Works for me!


For more Works for Me Wednesday ideas check out We are THAT Family.

Wednesday, March 16, 2011

Crafting and Baking Once Again

Yea!  My classes are finally done!  I now have time for baking and crafting.  I have been seeing several chocolate chip cookie recipes lately, and although I found the perfect CCC last fall,
I am willing to test that theory :) 

The ones I made today came from a recipe over at Brown Eyed Baker (drool);  Thick and Chewy Chocolate Chip Cookies.    They were big and soft (a MUST with CCC for me) but not at all cakey, and perfect.  Both recipes use melted butter.  I need to go back and see if they are the same!  
Can't go wrong here. 


After the baking I worked on a quick craft that I had book marked for a while, No Slip Bookmarks at Mary Janes and Galoshes.  I have a TON of ribbon in my craft closet that is perfect for this project.  Each bookmark took less than 10 minutes.  Seriously cute!  I can't wait to find more big buttons to go with my ribbon supply. Everyone is getting a bookmark for their birthday this year :)


And, I just looked at the CCC recipe from last fall and they are EXACTLY the same.  Funny.  No wonder they both turned out perfectly.