Showing posts with label made it. Show all posts

Saturday, November 10, 2012

Chunky Block Nativity Set

Here is an inexpensive gift for a child in your life.  Takes a little bit of elbow grease but is well worth the effort.  I can see these in my classroom and in my home for many years to come.


Nativity set made from a 4x6 scrap and old paint we had in the garage.   I cut, sanded, painted, sanded again (for the aged look), and then Mod Podged the graphic to the front of each block.


Mary, Joseph, Jesus (sprayed this block with gold before sanding the second time), the angel and star.


Caesar Augustus, Innkeeper, Wise Men and camel.


Shepherd man and boy, sheep, donkey and cow. 

I love how it's a very complete set.

I got the graphics from Prepared Not Scared.   They worked well and her script of the nativity play will go great while telling the story initially to my kids.  I'll laminate it as well so the kids can use it when they are playing with the set. 

I Can Teach My Child

Wednesday, December 21, 2011

A Wedding is Coming! A Wedding is Coming!


Toppers!
I made these out of clay instead of fondant so they could keep them. 


Top tier of cupcake stand where the giant cupcake will sit!
The bride put this together because we had to rig the cupcake stand so it would work.  LOVE this.


And lots of flowers!

The wedding is on Friday.
I'll share the finished product then :)

Tuesday, November 22, 2011

Funky Christmas Door Hanging Instead of a Traditional Wreath

Started with a picture frame from Salvation Army, took out glass and backing, and spray painted it white.


Hung funky colored ornaments (found at Michael's) with wire at different lengths.


Attached a few glittery floral sprays with wire to figure out placement but will go back with hot glue once I've got it where I like it.


Added a bow and called it a day.  I'll get a better picture of it once it is hung AFTER Thanksgiving.  Doesn't all this Christmas decore BEFORE Thanksgiving drive you a little crazy??  :)

Wednesday, November 16, 2011

The Turkey is a Big Hit!


I made a paper bag turkey for the dramatic play area of my classroom and it's been a big hit!  They have been basting, cutting, and serving it all day.  The tutorial can be found over at One Charming Party.  I stuffed mine with newspaper instead of popcorn to give it a little longevity.  It seriously took less than 5 minutes to make.  Got a paper bag and a glue gun?  Go make it!  Your kids will love it!

Wednesday, November 2, 2011

Ruffles!


It's on the imperfect side of things but I have a good handle on how to make it better next time.  
HERE is the completed cake.

Tuesday, October 11, 2011

Paper Pumpkins


I got the idea for these from Creations by Kara where she has a tutorial on them.  I didn't have orange spray paint so I used a paint brush and acrylic paint which worked well.  Cute fall decor or hostess gift!

Saturday, October 8, 2011

Sewing a Tube Necklace

I intended to make this necklace I found on Pinterest....

Pinned Image


 but didn't have enough fabric.  Don't you love the gray and yellow??  Here is my SIMPLE tube necklace......


Sew a tube (long rectangle, fold wrong sides together and sew down the long side), twist a little bit, and sew the ends together.  SIMPLE.

Friday, October 7, 2011

YoYo Painting and Fall Bulletin Board


When I first started my blog I featured Yo-Yo painting.  Cut off a leg of a nylon, fill the bottom with dried beans, tie it off, stick it in paint and bounce it off the paper in a yo-yo motion.  The girls loved it and just recently asked to do it again.  In the picture above they are making a friend a very large birthday card.

On a side note, the Yo-Yo painter is much easier to clean than I expected.  Just rinse and you are ready for the next time.


I then took this method of painting to class and they LOVED it and asked to do it again the very next day.  I took a piece of bulletin board paper big enough that everyone in class could stand around the perimeter.  One person yo-yo painted for a little while and passed it to the next person.  Each different round we used a different color and each person filled in the space right in front of them.  I then incorporated the paper into my fall bulletin board as the fall leaves.


See the dotty texture?  It worked perfectly and the kids are still asking to do this kind of painting again.    What are your fall bulletin board ideas?

Wednesday, September 7, 2011

Make Your Own Hullabaloo


The most used game we own is Cranuim Hullabaloo.  It's one game that I don't mind playing with the girls and at every age they have enjoyed it.  If you haven't heard of it, there is a control box that shouts out commands like, "Spin to a triangle.", "Slither to a food.", "Put your hand on a circle and touch your nose to a red.".  There are several pads that you lay all over the floor.  You are told how to move and where to go.  It reinforces colors, shapes, and simple categories (foods, animals, and musical instruments) and encourages creativeness as well, "Winner, do a funky dance.".  We play it over and over.   

I decided to make a similar game for my preschool classroom to help with letters, numbers, shapes, and colors.  I laminated several different colors of plain construction paper and cut a circle, triangle, rectangle, and square out of each color, big enough for at least two children to stand on it at the same time.  I purposely didn't draw anything on them before I laminated because I wanted to be able to change the items that were on them to correspond to our current unit or letter.  Did you know that Sharpie stays on a laminated surface when touched but comes off easily with an eraser?  This is perfect for me to change up the playing pieces.   I placed a piece of self stick Velcro (the harder side) on the bottom of each shape so an unsuspecting student doesn't slide across the room while jumping to a green.  It doesn't make the piece completely stick to the floor but it does catch so the piece won't slide.

I was thinking of putting slips of paper with directions on them in a bowl and draw them as we go, but decided to just call out moves as we go.

Possible items to mark on the pads:

Letters (capital and lower case)
Numbers
Site Words
Anything you can draw with simple catagories.


Possible movements:

Slither
Jump
Crawl
Skip
Jump
Move sideways
Fly
Zoom
Dance

Possible commands:

Move sideways to a red.
Slither to a capital letter.
Fly to an animal.
Put your knee on a vowel, touch your nose to a square.
Crawl to a hippopotamus and join hands with as many friends as you can.
Zoom to a letter that is in your name.

You get it :)
Have fun with it!

This made up game works for me!
See more Works for Me Wednesday ideas as We Are THAT Family.

Tuesday, September 6, 2011

Randomness


I needed to line some baskets for my classroom so I used a pair of old pajama bottoms for the fabric.  I didn't use a patterns but kept putting things together until they were how I wanted them.  I love experimental sewing when it goes right.  It's good for the soul.


Emma found a butterfly that wouldn't let go of her.  It climbed up her arm and into her hair.  There was some squealing involved.   It had some wing damage so we don't think it is going to make it.  She put it into one of our potted herbs where it stayed for a long while.  When we came out several hours later it wasn't there.  Maybe it flew away (or maybe it was a bird's dinner.....circle of life, right?) 


Here's the special treat I gave my students on the first day of school.  I just love the square marshmallows.  They are so s'more friendly, how could you not love them?


Here is Scarlett with a picture she drew of her and her sisters (and their hermit crab, Hazel).  So cute!
The new washable dry erase markers are a mom's best friend. 

Anyone try the dry erase crayons yet?  I'm a bit skeptical.

Tuesday, August 9, 2011

Can't Get Enough Pinterest Color!


If you are on Pinterest I am sure you have seen this type of melted crayon art.  The colors, the medium, the simplicity......I couldn't resist making one for my classroom!   Canvas, crayons, glue gun, blow dryer, done.

I still haven't figured out how to pin items that are not already on someone's Pinterest board (I mainly use aol and cannot load a tool bar to aol) but I have not run out of boards to look at.  In fact, I have to force myself away from the computer because it sucks me in so easily.   Usually I am into food or cake boards but this last week has been all about preschool ideas.  So much good stuff!


Do you use Pinterest?  What sucks you in?

Thursday, August 4, 2011

Make Your Own Pencil Case!


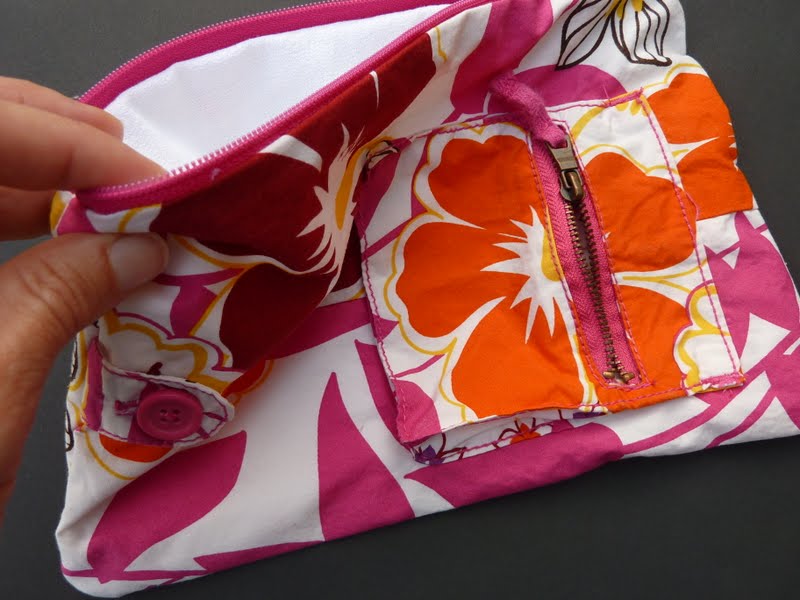
I finally bought the zippers I needed to make the rest of the pencils cases I had cut out and I just love them!  I used this awesome TUTORIAL at Creation Corner.  Her directions are perfect!  The first one I made out of an older sweater, which I posted a few weeks ago, so I had to improvise.  These three were made using the tutorial exactly and took less than 30 minutes a piece to put together! 


The one above is embellished with the ruffle, like the tutorial.  I used a 9 inch zipper and cut the material accordingly.  They had to be long enough for pencils but I made them deep enough for LOTS of pencils, or whatever else a girl may need to store in there. 

The flowery ones are made out of these.....(which required too much ironing for the likes of this house).


I cut them to incorporate the little zippered pockets that were already on the pants.  Bonus - an eraser pocket!  I also left the button and loop on just for a little extra flair :)


Project complete.  Now I can clear off the sewing table!

Linking to:


Party ButtonFantabulous Friday!>> http://linesacrossmyface.blogspot.com/search/label/the%20Cure%20for%20the%20Common%20Monday

Saturday, July 16, 2011

Repurposed Sweater Pencil Bag


The Repurposed Sweater Pencil Bag


I saved this baby sweater because I loved the colors and figured I would find something to make with it. Bigs needed a pencil bag for next fall and she chose this from the fabric scraps presented to her. It's a little longer than a normal pencil bag because I didn't want to have to restitch the side seam. I cut the bottom off the sweater, stitched the cut side together, did the little wrap around stitch so the sweater won't come undone, then sewed the zipper in.  It turned out cute and I still have plenty of sweater left :)


Wednesday, March 16, 2011

Crafting and Baking Once Again

Yea!  My classes are finally done!  I now have time for baking and crafting.  I have been seeing several chocolate chip cookie recipes lately, and although I found the perfect CCC last fall,
I am willing to test that theory :) 

The ones I made today came from a recipe over at Brown Eyed Baker (drool);  Thick and Chewy Chocolate Chip Cookies.    They were big and soft (a MUST with CCC for me) but not at all cakey, and perfect.  Both recipes use melted butter.  I need to go back and see if they are the same!  
Can't go wrong here. 


After the baking I worked on a quick craft that I had book marked for a while, No Slip Bookmarks at Mary Janes and Galoshes.  I have a TON of ribbon in my craft closet that is perfect for this project.  Each bookmark took less than 10 minutes.  Seriously cute!  I can't wait to find more big buttons to go with my ribbon supply. Everyone is getting a bookmark for their birthday this year :)


And, I just looked at the CCC recipe from last fall and they are EXACTLY the same.  Funny.  No wonder they both turned out perfectly.

Tuesday, February 1, 2011

You Make My Heart Melt

I made these Valentine's cards for my preschool class.  They were featured in Family Fun magazine this month and I just fell in love.  Aren't they sweet :)

Tuesday, December 21, 2010

Last Minute Gift?? Marshmallow Shooters!


I bet you that Lowe's or Home Depot aren't THAT crowded these last few days before Christmas. You could buy materials for these little guys and be home before you could even get a parking spot at Target.

We had a $3 limit for a child's gift exchange and didn't want to get cheap things that parents sneak in the trash the moment the child looks away (What?! Am I the ONLY parent that does that?).

These each cost less than $3 and took less than 5 minutes to make. Shooting marshmallows is super fun for girls and boys (and parents). My girls tried them out and giggled with excitement every time a marshmallow shot across the room. You place the marshmallow in the end and blow through the top. They shoot about 10 to 15 feet and it's FUNNY when you get shot on the noggin with a marshmallow.


I got the plans to make them at The Ultimate Camp Resource.

Wednesday, December 8, 2010

Wood Burning a Popcorn Bowl


A very, very long time ago I used a wood burning pen to make a checkerboard. It took forever. I seemed to forget about that when starting this bamboo popcorn bowl for my dad for Christmas, because again, it took forever! Can you say hand cramps? It was worth it. I like it and I hope his popcorn eating self does too :)
Do you have a wood burning pen in the back of your closet? Put it to use by personalizing something for Christmas! Works for me!
See more Works for Me Wednesday ideas at We Are THAT Family.